Advanced Pattern Cutting Class Week 1
- Elfy
- Mar 18, 2020
- 3 min read
15 hours, 1 photograph, and a whole lot of calico... What could go wrong?!
Week 1. Dissection.
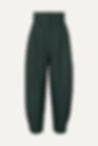
To start we were given a photograph of a garment we wanted to make, the image to the right is the only image I can find that shows trousers similar to the ones I had to make.
To start I went through dissecting the photograph for information( length of leg, the width of waistband, what the pannels are, what fastenings are included, what the pockets look like and where they are placed, and how the legs were shaped, e.t.c)

I could see that a lot of the shaping of the leg came from a set of darts on the Centre Front at the knee, and on the Centre Back at the hem which would taper the leg in. I also determined that the pocket had a cover detail to create a military-inspired look and that it was the extra thick waistband that made the trousers so high waisted.
Pattern Cutting.
It made sense to work from the Women's Trouser blocks for making my initial pattern alterations.
I traced the block and then made the following alterations:
Centre Back
1. Add 2cm to the bottom hem and add 1cm fishtail to both sides of the leg. (This will make it easier to hem later)
2. Mark where the darts will be:- 5cm in from both sides of the trouser leg along the hemline. Each dart is 3.5cm wide. Mark where the dart meets 33cm up from the centre of each dart mark.
Centre Front
1. Add 2cm to the bottom hem and add 1cm fishtail to both sides of the leg.
* if adding in horizontal darts on the leg the ending leg panel will be too short, I will need to compensate for this at the bottom of the leg.
2. Add one dart on the side seam 5cm above the knee. Each dart is 3cm wide. Come in from the side seam by 10cm and mark the dart close.
3. Add second matching dart 5cm below the knee.
Pockets
1. Mark 6cm in from the side seam on the CF panel.
2. Mark a notch 14cm down from the waistline along the side seam on the CF panel.
3. Join the notches.
4. Create the pocket bag by drawing straight down from the first notch and drawing straight across from the second notch. Join the lines with a small curve.
5. Mark in the decorative flap pattern piece:
- on the pocket opening line mark 1cm in from the ends of the line.
- from the opening draw 5cm long perpendicular lines from the marks created.
- mark halfway between marks on the opening. From this notch draw a notch 9cm perpendicular.
- Join the 5cm and 9cm lines.
Zip and Fly
*The length of your placket and fly depends on how long your zip is- I was using a 7" zip so all my measurements are for that.
1. Mark where the zip will end on the crotch line of your CF Panel.
2. Mark 2cm bellow the last notch.
3. Draw 3cm out from the waistline and the bottom notch.
4. Draw a line to join the 2 new lines and make a rectangle.
5. Draw a small curve at the bottom of the rectangle to ignore the bottom corner.
* The Rectangle is your fly, the curves piece is your placket.
Waistband
1. measure the CB waist - 21cm
2. measure CF waist including placket size - 23cm
3. Draw both measurements in 1 line marking where one ends and the next begins- that is your side seam notch.
3. extend the ned of the line by 3cm so that you have excess when sewing.
4. make the waistband a rectangle that is 5cm thick.
My working notes:


